Notes on “Designing T-Shirts with AI Images”
Princeton ACM / IEEE Computer Society
August 15, 2024
Our speaker, Larry Ward, demonstrated how he uses his computer to create T-shirt designs.
Examples of some of Larry’s work can be found on “The Math Art Store” online:
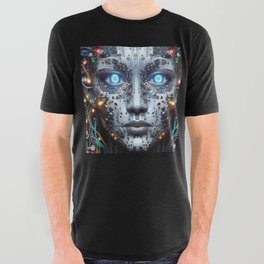
Here is a basic example:
Larry covered three important topics:
- Topic 1. How to create a T-shirt design file (for the Society6 website using the GIMP graphics editor)
- Topic 2. How to create a 1024x1024 design picture using AI (using Bing Image Creator)
- Topic 3. How to “upscale” the 1024x1024 picture to 2048x2048 (using ImageMagick)
Topic 1: Creating a T-shirt design file from an image file
(A T-shirt design file that includes a picture that you want on the front of the T-shirt)
This part of the process is complicated – you need a graphics editor.
Fortunately, GIMP is a free image editing tool, and (like many powerful image editors) it supports creating an image file from a set of "layers".
Larry Ward likes free tools. GIMP is a bit complicated, but it is powerful graphics editor. It’s much more powerful than a simple drawing package like Microsoft Paint. To make a good T-shirt design file, it is only necessary to put together *3* layers – the T-shirt template, a black background, and an artistic image – then use the GIMP export command to generate a single T-shirt design file.
Installing GIMP
There are directions for downloading and installing the free GIMP graphics editor on the GIMP website:
Using the Society6 template
Society6 (https://www.society6.com) is Larry’s favorite T-shirt manufacturer, because their shirts are high quality, using dye sublimation as the printing process. Society6 has an extensive blog with useful information for product designers.
To learn more about what Society6 can do, start here:
Society6 requires a PNG graphics file, and it must fit their standard T-shirt template.Here is the complete list of templates for Society6 products:
For T-shirts, choose the “All Over Graphics T-Shirts” template (8700x7050)
- you will get the following file: “all-over-graphic-tees.psd”
This T-shirt design file shows the outlines of the front, back, left sleeve, and right sleeve of the T-shirt - to help you line up the graphics in your T-shirt design file. There are two outlines – one for “Small” and one for “XXL”.
The process that Larry uses for creating a Society6 design file: he will have three “layers” in GIMP.
- top layer is the template
- second layer is your artwork
- bottom layer is your background (an “all-black” image file works great!)
Using GIMP plus the Society6 template
It’s a 7-step process to create a T-shirt design file (in PNG format):
step 1. Open the Society6 T-shirt template file (all-over-graphics-tees.psd) into GIMP. Answer “Keep” to the popup box regarding the embedded color profile.
step 2. Use “File->Save As” to save the current GIMP state to a new file (so you don’t overwrite the template). For example, create a new empty directory called my_tshirt, and save the template as my_tshirt/Tshirt_design1.xcf – an XCF file is a GIMP native graphics file
step 3. Create an all-black JPG file that is the same size and resolution as the T-shirt template file (8700x7050). Load it into GIMP as a new layer. (All of Larry’s Society6 shirts have a black background because the sheerness of the polyester material.)
The step 3 process is easy to do in Microsoft Paint:
-
1. Open Paint
2. type “Ctrl-W” to bring up the Resize and Skew pop-up
3. click on Pixels, click on the blue box between Horizontal and Vertical (to cancel keeping the existing window’s proportions)
4. enter 8700 for horizontal, 7050 for vertical, then click OK
5. click on the paint bucket, then click on the main screen area to turn everything black
6. choose File->Save As->PNG picture – save it to the same my_tshirt directory (as black.png)
Alternatively, you can use GIMP:
-
1. open GIMP
2. choose File->New, enter Width 8700, Height 7050, and click OK
3. click on the paint bucket, then click on the main screen area to turn everything black [or you can select “Tools->Paint Tools->Bucket Fill”, then click on the main screen area]
4. choose “File->Export As”, type in “black.png” for the file name, click “Export”
You can load the all-black file by doing a drag-and-drop – drag the black.png from your File Explorer into the "Place artwork here" line within the lower-right panel (the “Layers” panel) of the GIMP editor. The all-black layer becomes a “sub-layer” of the “Place your artwork here” layer.
step 4. Load in a 2048x2048 image file with your T-shirt image into GIMP as a new layer. (Make it a sub-layer of “Place your artwork here”, and drag it to put it just above the black sub-layer.) If the name of your artwork file is face.jpg, you will see “face.jpg” in the lower-right panel just above “black.png”.
step 5. Use the GIMP editor to move the image so that it is centered on the front of the T-shirt. (The image is initially inserted the center of the 8700x7050 area, which is *not* the right place.) We will “edit the Layer Attributes Panel” to move it.
-
1. Right-click on the newly-inserted image layer (“face.jpg”) in the lower-right panel and select “Edit Layer Attributes”. You will see a pop-up box with all the attributes.
2. Change the “Offset X” value to 1050, change the “Offset Y” value to 3002. Then click OK.
3. You will see the image move leftward to the center of the T-shirt back!
4. Save your work! In the main menu, choose File->Save
step 6. Before exporting the image, “Hide” the T-shirt template layer. In the Layers panel of GIMP, click on the eyeball for the layer labeled “HIDE before exporting”.
Your layers should look as follows:

In this case, the face layer is the AI-generated image.
step 7. Use the “File->Export As” command in GIMP to generate a PNG file. That file should show the T-shirt design on a black background.
How should I create the 2048x2048 image file?
You need an image file for the T-shirt graphics in step 4 above. This part of the process assumes that you have already created a 2048x2048 image with your favorite artwork for the T-shirt.
If you are an artist who is really good at drawing on the computer, this is the only part of the process you need to design a T-shirt.
*But* if you are like most of us, you may want to use AI to do the drawing work. The rest of this document explains the two preliminary steps you can follow to generate an image *and* rescale it before launching into GIMP to make the final T-shirt design file.
Topic 2: Generating an image using AI
In this section, we will talk about generating an image using AI – with the free online Bing Image Creator.
Larry Ward believes in using free tools whenever possible, and the best free AI tool for image generation is probably Bing Image Creator. [https://www.bing.com/images/create]
You need to create a free Microsoft account to use the tool. (If you are using a Windows 10 or Windows 11 workstation, you may have a Microsoft account already. But if you are using Linux or MacOS, you may get prompted to create a Microsoft account to log in to Bing Image Creator.)
It’s an easy tool to use – just type phrases into the Image Creator prompt and click the Create button. You usually get 4 images from each Create command. Once you see an image that you like:
step 1. click on your image choice step 2. click on the Download option step 3. it will put a JPG file (1024x1024 resolution) in your Downloads folder
How do I turn the cool image into a T-shirt design file?
Once you have a great image for your T-shirt, you can use the rest of the steps in this document to create a T-shirt design file.
- First use Topic 3 below to rescale the 1024x1024 image to 2048x2048 (using ImageMagick).
- Then use Topic 1 above (using GIMP, a T-shirt template, and your 2048x2048 image) to make a T-shirt design you can send to a T-shirt manufacturer!
Note: Larry gave a great talk on how to use Bing Image Creator for TCF 2024 in March 2024 – you can watch the recorded talk on YouTube – https://youtu.be/w-qPZvYCqTs.
In Larry’s TCF 2024 talk, he gives some good pointers on how to fill in the Bing Image Creator prompt line to get more interesting images.
Larry also gave us a warning – don’t abuse Bing Image Creator. There are a number of Code of Conduct rules that you need to follow… like “don’t create content that can be used to harass, bully, abuse, threaten, or intimidate others; don’t violate the privacy of others; don’t violate intellectual property rights.” You will get a warning from the system if you violate the rules, and if you are warned repeatedly, you might have your access suspended.
Topic 3: Rescaling an image to 2048x2048
This section describes how to convert an existing image to a larger size and resolution using ImageMagick.
Larry Ward has found that when he designs T-shirts, the T-shirt image needs to be 2048x2048 pixels.
If you are working with a higher or lower resolution image, you need to rescale the image.
For a 1024x1024 image, the best way to rescale is to use a tool that will try to “interpolate” the in-between pixels, rather than just doing a dumb rescaling. The best free tool to do the rescaling is ImageMagick, which is a command-line program that is easy to install on Windows, MacOS, and Linux.
Installing ImageMagick
step 1. Go to the installation information webpage for ImageMagick: https://imagemagick.org/script/download.php
step 2. For Windows, download the self-extracting archive for Windows (a file ending in .exe), execute it to install ImageMagick
step 3. For Linux, two choices: a. download the portable standalone “magick” executable file (https://imagemagick.org/archive/binaries/magick) b. or download an RPM installation file for Linux and install it (ImageMagick-7.1.1-36.x86_64.rpm)
step 4. For MacOS, use the MacOS command line to first install Homebrew (https://brew.sh), then use the command line "brew install imagemagick" to install ImageMagick.
ImageMagick has a command-line interface. The only command you need to convert a graphics file to a new resolution is the "magick" command with the -resize flag.
-
$ magick convert originalfile.jpg -resize %200 newfile.jpg
Signing up for Society6 – printing your T-shirts
Society6 is an online art market – not just T-shirts – and you can sign up as a Society6 artist if you want to upload your T-shirt design files to the Society6 site.
step 1. Go to https://society6.com/register – for an Artist account – you need to create a login name, enter your screen name, enter your email address, and create a password for your account
step 2. It will ask you which level of Artist membership you want – choose “Free”
step 3. Go to Artist Studio – https://society6.com/artist-studio – the first time it will show a “Get Verified” button.
Note: To get verified, you need a PayPal account. The verification process will cost $0.01 (one cent), and it will be charged to your PayPal account. (This is a one-time charge when you perform the verification of your Society6 account.)
To upload a T-shirt design to Society6, you need to register as an Artist. In the registration process, you need to have a PayPal account. There are two reasons Society6 requires a PayPal account.
- It prevents bots from creating thousands of Society6 accounts.
- It’s how you will get paid for your artistic work! If you want to “sell” your T-shirt design (so that other people can order your T-shirt online), the PayPal account that you provide is where you will receive your commission on the T-shirt sale. (10% for Society6 “Free” members)
Review of the Society6 process
Here is the end-to-end process for creating a T-shirt design for the Society6 template:
- First use Bing Image Creator to create a 1024x1024 image file.
- Next use ImageMagick to rescale the image file to 2048x2048 (save it as face.jpg).
-
$ magick convert originalfile.jpg -resize %200 newfile.jpg
- Finally use GIMP, a T-shirt template (all-over-graphic-tees.psd), and your 2048x2048 image) to make a T-shirt design you can send Society6.
-
1. Open the all-over_graphic_tees.psd file in GIMP
2. Use “File->Save As” to save as a new file immedately (my_new_shirt.xcf)
3. Create an all-black 8700x7050 PNG file as the background layer (black.png)
4. Add two new layers to your GIMP project: face.jpg and black.png
5. Align the face.jpg image with the template: use “right click -> Edit Layer Attributes” on the face.jpg layer, set “Offset X” to 1050, set “Offset Y” to 3002
6. Hide the template and instructions
7. Use “File->Export As” to export your design as a PNG file - You will need to go to the Society6 website and register as an artist, then use the Society6 Artist Studio to load and manage your T-shirt design.
Signing up for CafePress – printing your T-shirts
CafePress (https://www.cafepress.com) is another option for printing T-shirts. CafePress site can be used in two ways: 1. to create and purchase your own custom products and 2. to set up storefronts to sell your products.
CafePress T-shirts are lower quality, using screenprinting as the printing process. Depending on the image content, you may want to go with this option for artistic purposes.
Here is information from the CafePress customer support pages on designing and purchasing your custom products:
You must use a Google Chrome browser. Go to https://www.cafepress.com and select “Create Your Own” at the top left corner. Then you can choose from T-shirts, sweatshirts, hoodies, and so on. When you find the item you want, click on it to start designing. Look for the items that say “Your Photo Here”.
Once you are done designing, DO NOT CLICK SAVE. Please select “Review”, and if you are happy with the preview, please select “Add to Cart”. The item should go into the cart for you. If you need to add more custom items, you must save your shopping cart and repeat the process for each item. You can save your cart by entering your email address in the bottom left corner of the shopping cart and selecting “Send Link”.
When you are ready to order, go to your email and click on “View Cart” for each item you saved. You will eventually see all of your items in the shopping cart.
For CafePress, you do not need to scale up the resolution of your image to 2048x2048. The CafePress designer website will automatically rescale your image as needed.
